Cooling liquid (also refered to as antifreeze, which is not true because it is in fact a mixture of distilled water and antifreeze) is expected to be flushed every two years, drained every year according to the maintenance schedule.
The difference between drain and flush is broadly the same as between just renewing and cleaning plus renewing. The French would say "vidange" and "purge".
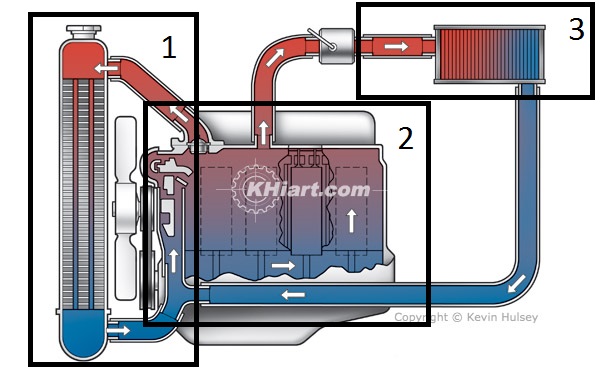
In fact the system comprises three parts : radiator (1) , engine block (2) and heater matrix (3) (or core) and to proceed correctly, according the WorkShop manual (L3), these three parts need and independent flush.
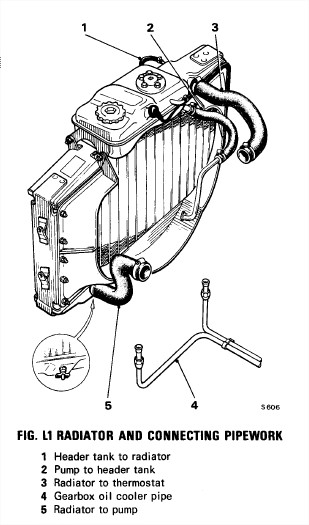
The radiator itself comprises a header tank and the radiator, so a "serious" flush could also mean a separate header tank removal and cleaning.
All these elements are linked by a (costly) set of hoses which may need to be replaced if signs of wear. Not forgetting about the thermostat which is an important part of the system.
Draining the cooling system (summary from L3 section of WM)
1. Put car on a ramp cold engine
2. Pull handbrake / disconnect thermo cutout from fuse board
3. Switch ignition on but do not start engine
4. Set either LOWER ou UPPER air conditionning switch in full clockwise position
5. Switch ignition off
6. Open radiator cap
7. Fit waste pipe to radiator's drain tap (located at bottom) in order to direct drain liquid to a pan
8. Open radiator's drain tap and let liquid bleed
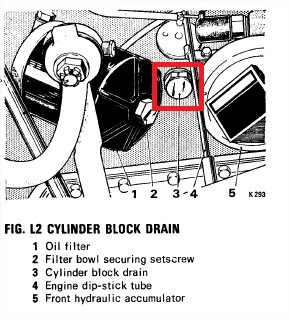
9. When empty, remove the two drain plugs adjacent to oil filter located on both sides of the cylinder block.
Note that : What is the point of disconnecting the thermo cutout ?
For safety reasons, the Workshop Manual reommands removing this element in various situations. I Assume that the car being on P
position and handbrake pulled, there is still a slight risk of some
electrical event in the gearshift that would "loosen" the gearbox and
make the car move on its wheels ?
Anyway. I've found that either disconnecting the battery or using a battery isolating switch
will do the same thing as long as you do not need the engine running.
In this particular case, removing the thermo cutout would be the
solution.
If you only have to change the thermostat a short drain of about 2 quarts (about 2 litres) is enough
A full drain of the system means to release all the possible liquid from the radiator, that is about 16 litres.
So as we can see, draining the cooling liquid doesn't mean cleaning the whole system from its sediments , which is performed by a flush.
Flushing the entire system
Flushing means removing all the old and nasty liquid and sediment from every
part of the system. This implies a different and longer process of
cleaning separately every element of the system and also removing some
of the hoses that are connecting them together. Basically it is
performed by letting clean water circulate into the system under
pressure as long as necessary
Flush part 1 - flushing the radiator
1. Begin by a radiator drain as described above
2. Remove upper (inlet) and lower (oulter) hoses from radiator
3. Fit a waste pipe to upper (inlet) connection of radiator
4. Apply mains water under pressure through lower (outler) connection of radiator
5. Let water circulate during 30 minutes in order to remove sediments
Manual warns that no alkaline compound should be used to enhance cleaning this would deteriorate the aluminium alloy.
6. Check the hoses for signs of wear and if it is the case replace.
Flush part 1 continued - removing and cleaning the header tank
Taken from Tee One Topics issue 3 June 2001 page 12
See here for detailed description.
Usual problems with header tanks are leaks, rotten or lost sensor boots, leaking filler cap seals or pressure valve seals.
Flush part 2 - flushing the engine block
1. Remove the lower (outlet) hose from radiator
2. Remove drain plugs on each cylinder head
3. Open thermostat housing, remove thermostat, close thermostat housing
4. Fit a waste pipe on each drain plug aperture and apply mains water
on the other aperture let water circulate for 30 minutes or until clean
water bleeds
5. Fit drain plugs and fit thermostat with new gasket.
Every two years thermostat should be changed for a new one.
6. Check the hoses for signs of wear and if it is the case replace.
Flush part 3 - flushing the heater matrix
1. Remove both hoses form heater matrix : one to tap and one to water coolant pump
2. Fit waste pipe to the inlet connection (on the tap side)
3. Apply mains water to the outlet connection for 30 minutes
4. Examine both hoses for signs of wear and if necessary replace.
This Alternative method for flushing the system without removing the hoses is NOT recommended (see messages below)
1. First, make a proper drain of the radiator as describe above
2. Clamp back the coolant hose and / or close the drain tap
3. Fill the system with distilled water up to the top level marks.
4. Start the engine, switch the heater on
Wait until the engine reaches its "operating temperature" in order to have the thermostat opened
5. Then drain the radiator again
6. Check the flushed liquid colour : if it is still coloured / dirty, it means that you can flush another time.
16 liters of proper fluid are required
In order to ease refilling set either LOWER or UPPER air conditioned switches to full clockwise position.
1. Check that every hose and drain plugs are tightly in place, check that the radiator drain tap is closed.
2. Slowly pour liquid through the fill opening of the header tank, slowly will avoid the air locks
3. Switch engine on and let if warm up to normal operating temperature in order to dispatch liquid
4. Cut engine and carefully check liquid level "The correct level is when the
coolant reaches the rubber seal in the filler neck" (Blimey how do I see this ??)
5. Fit the radiator filler cap
6. Check for good tightening of hoses clamps
7. Check for leaks
Note : Proper level is when you see liquid remaining in the flat part of the header tank, engine cold see ref here
Advices from the forum experts
I am for the first time undertaking the flushing of my cooling system
myself. I found that the removal of the engine drain plugs to be
extremely difficult in as much as they appeared to have been put in
extraordinarily tight. Each plug is equipped with a fine shiny steel
washer. Could I ask: (a) Engine drain pugs : is there an alternative type of washer that could be safely used?
Any washer that fits should be OK.
Personally I might be tempted to use nylon ones
as replacements since they will seal at much lower torque figures as
long as the mating surfaces are clean and without scoring. (b) what is the appropriate torque setting for the plugs? As
long as the threads are clean on both sides then the spanner length is
a good indicator of torque without using a full torque wrench.
As long as you don't try and bend the spanner shaft then a decent 'firm
tweak' on it should be adequate: Less so if you've resorted to the
nylon sealing washers as you don't want to crush them. (c) should/could a liquid gasket type compound be used on the threads?
Absolutely not! If you have any doubt about the fit of the bolt you
should replace it. If you just doubt its water tightness you can wrap a few turns of PTFE tape around the threads.
In addition :
When flushing any cooling system I prefer to temporarily remove the
thermostat, replace the cover with the bolts just nipped up and finally
shove a garden hose in the top radiator hose to backflush the block.
If secured and 'sealed' with an old rag it should hold there for the 30-40 minutes that you leave the hose running.
After that I repeat the exercise to backflush the radiator separately for a similar period via the bottom radiator hose.
If you have any doubts about how much silt, gunge and/or muck that mayhave
accumulated in the system there's nothing wrong with adding any
proprietary cooling system flushing additive a few tens of klicks
before draining and flushing the system.This is Brian's advice from RR Forum :
If you're trying to decalcify the system, and not just flush out the
old coolant, you might want to try a water and citric acid bath.
Correct proportions are 10% citric acid - 90% water (I found).
If you go this route you do need to do a thorough flush (either by
refilling the system with water, running it for a bit and emptying it
out or the more conventional approach).
I do not ever remove the drain plugs in the engine block.
Distilled water is not only useless but also nocive : With
regard to the slavish devotion that certain quarters have for distilled
water, well, it's a bad idea. See the attached file. Although not
specific to Rolls-Royce or Bentley, the issues discussed in regard to
coolant water apply far more widely than to just the specific engines
in the paper.
And Byteme adds : Using distilled or even demineralised/deionised water
would be like burning money unless you're able to recover, filter and
re-use it. In any case it will provide no benefit.
And another advice by Byteme
The entire purpose of the extended flushing
detailed on the manual is to dislodge and flush away and solid
particulate matter. It requires huge volumes of water. It is especially
recommended for "neglected" cars.A thorough flush will do no harm whatsoever and will likely provide some benefit in vehicle that has been neglected.
About hard water : If you still have any remaining concerns just buy a ready to use coolant rather than concentrate.
About possible coolant loss
Coolant loss was a known concern with these engines and there is a manufacturer's service bulletin that detailed adding Bar's Leaks to the system when refilling.2015 - Feedback&comments are welcome at jostjc - at - Gmail dot com
 Home |
  Links&Readings |
Browse by Subject (alphabetical) |
Maintenance Projects
Links&Readings |
Browse by Subject (alphabetical) |
Maintenance Projects